How to Open Asus Google Meet Hardware
Install your Meet hardware system
Here's how to install and ready Google Meet hardware for your company or group.
Before you lot begin
- If your organization does non use Google Workspace, before yous install any devices, run into Verify your organisation's domain.
- If you're not sure if you use Google Workspace, enquire your organization'south Information technology ambassador for help.
Footstep 1: Read your welcome email
To avoid errors, you demand to read the information in your welcome e-mail earlier you plough on and enroll any devices. Your welcome email has information about device licenses and how to admission the Google Admin console. Y'all need a device license for each Chromebox you want to enroll and at least 2 devices and two licenses to communicate between rooms.
To bank check how many device licenses you have:
- At the left, under Google Meet hardware, click Licenses.
- On the Subscriptions folio, click Meet hardware management to verify the number of licenses in your domain.
Step 2: Review requirements
Make certain the room, network, and other components are ready to go. Review the Google See hardware requirements.
Step 3: Unpack the box
Every kit includes a carte du jour with your device's series number. Keep this carte and annotation the room where the device is located so you tin easily identify which device is in which room. You need the serial number if yous contact support for assistance.
The Chromebox supports multiple models and types, and the kit does not include display monitors. Use a 1080p (1920 x 1080 pixel resolution) monitor with a screen size between 40 and 55 inches (101 and 140 cm). For guidance on correctly sizing your display, read the Google Room pattern guide.
Check the box to brand sure no items are missing or damaged. If needed, contact the manufacturer or your Google reseller.
Serial I
Serial One cabling
Series 1 hardware uses ability over ethernet (POE) for connections between devices. Cables are included with the hardware in the following lengths:
| Device type | Cablevision length | Cable type |
|---|---|---|
| Smart photographic camera Lite | 2m (6.5ft) | CAT 5E UTP 28AWG |
| Smart photographic camera XL | 2m (6.5ft) | CAT 5E UTP 28AWG |
| Smart sound bar | 2m (half dozen.5ft) | CAT 5E STP 28AWG* |
| 5m (16.5ft) | CAT 5E UTP 28AWG | |
| Add-on audio bar | 2m (half dozen.5ft) | Cat 5E UTP 28AWG |
| Mic pod | 2m (six.5ft) | Cat 5E UTP 28AWG |
| Come across bear on controller | 5m (xvi.5ft) | CAT 5E UTP 28AWG |
| Run into compute system | 2m (6.5ft) | CAT 5E UTP 28AWG |
*CAT5E STP or higher for compute box to smart audio bar only
Each cable length tin can be extended in accordance with TIA/EIA 568-C.2 standards to back up a wide range of installation scenarios. Delight refer to these guidelines when planning your installation:
- CAT5E or higher.
- 24AWG or higher is recommended for cable lengths longer than 10m.
- Cables that are terminated on-site from bulk cables must exist certified to CAT5E or college using a cable tester.
- Patch connections from bulk cabling tin be used if the total point-to-point cable run is certified, tested, and does not exceed TIA/Eia 568-C.ii standards.
Google Meet hardware kit (Asus)
Depending on the model, your Google Run into hardware kit tin can contain:
- Chromebox
- Camera
- Google Meet speakermic and touchscreen controller
- Getting started guide
- Mounting bracket
- Mounting hardware
- Table mat
- Camera USB cable
- Speakermic cable
- Touchscreen mini-HDMI cable (green)
- Touchscreen mini-USB data cable (blueish)
- Touchscreen micro-USB power cablevision (ruby-red)
- Chromebox power cable
Google Meet hardware speakermic
The Google Encounter speakermic contains:
- Google See speakermic
- Speakermic power cable and wall adapter
- Ethernet cablevision to connect multiple speakermics
Step 4: Install the hardware
For guidance on how best to programme and install your Meet hardware kits, refer to our Room design guide.
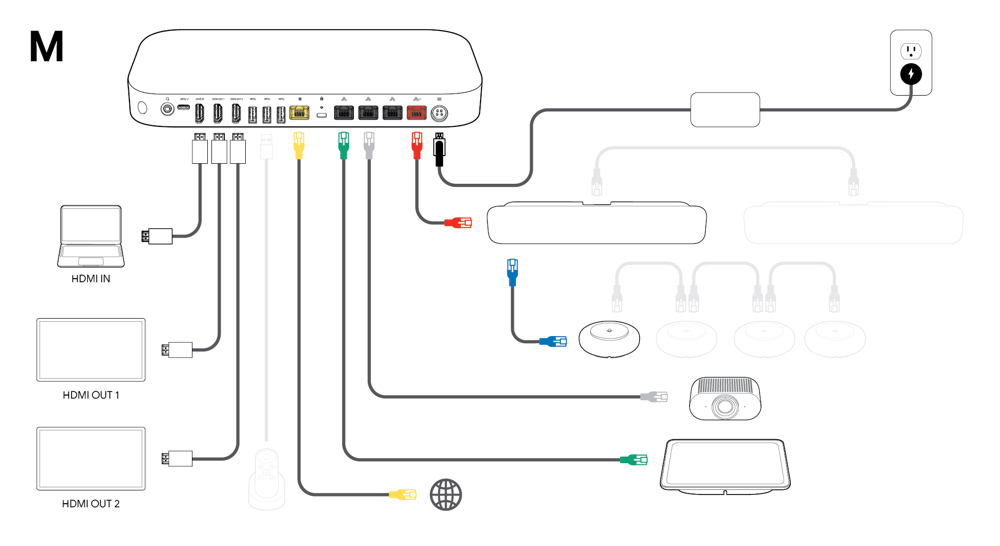
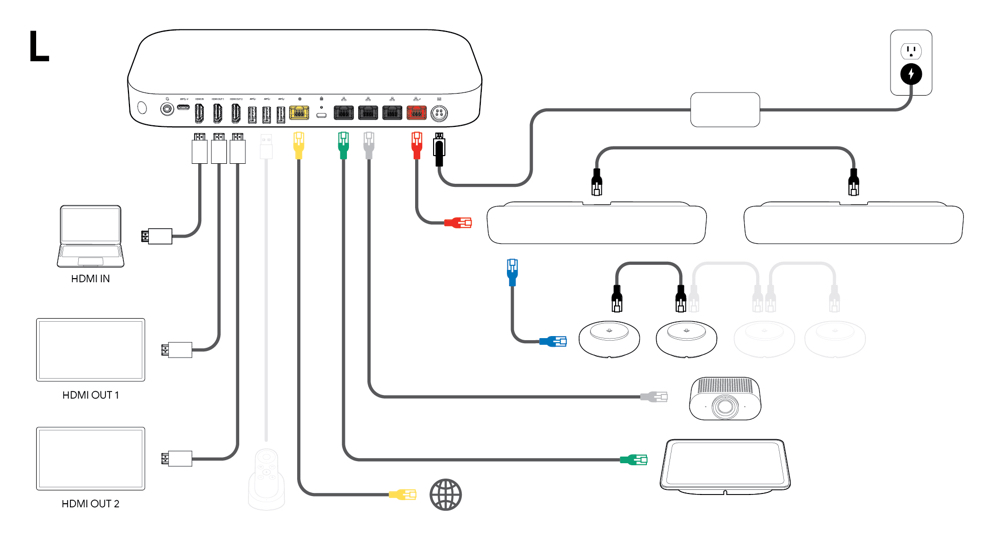
Stride 5: Connect cables
Utilize your Chromebox over a wired network connection for best sound and video quality. However, you can also use it over a wireless network connectedness.
Of import:
- Connect cables first, so connect to a power outlet.
- Ensure Cat 5e cables are properly seated.
- Cables ends are colour coded for easy identification.
Series One
Pocket-sized room

Medium room
Large room
Logitech Meet hardware kits
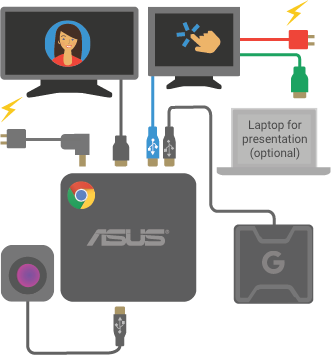
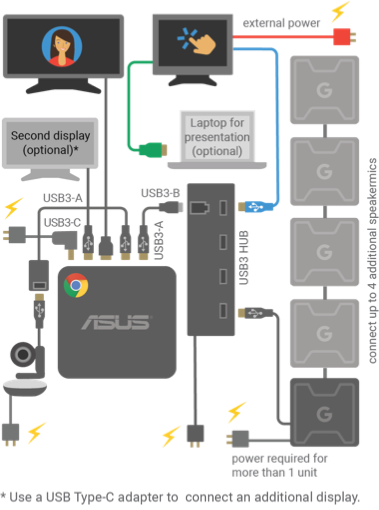
Google Meet hardware kit (CN65)
Pocket-sized room
Large room
To impress this diagram, download Welcome to your Google Meet hardware kit (pdf).
Tips
Connect the speakermic, monitor, and camera direct to the Chromebox or connect them to the Chromebox using qualified USB 3.0 hubs. Use the USB cable to connect the touchscreen directly to the Chromebox. For Chromebox CN65, the secondary video output is USB Type-C.
You lot tin connect multiple speakermics to the Google Meet hardware. For more than information, run across the Run into speakermic Quick Start Guide.
Do non plug the HDMI cablevision from the touchscreen into the Chromebox. This cablevision is plugged in to your computer to present content only to the room. If both HDMI and Displayport are used, HDMI will act equally the primary display.
In the CN65 hardware kit, the arranged power supply has a college wattage. It's not compatible with older, existing power supplies.
Related topics
- Qualified peripherals for Google Meet hardware kit
- Run across speakermic Quick Start Guide
- Present using an HDMI cable
Stop of life Google Run across kits
Next steps
- Enroll your device
Google, Google Workspace, and related marks and logos are trademarks of Google LLC. All other company and product names are trademarks of the companies with which they are associated.
Was this helpful?
How can we amend it?
0 Response to "How to Open Asus Google Meet Hardware"
Post a Comment